Hello,
I will show you how to easily set up Cloudflare, Edit Records, and Troubleshoot with images!
PLEASE READ BEFORE STARTING!!!
- Cloudflare cannot be used on free subdomains from InfinityFree.
- You can use Cloudflare on Custom Domains (yoursite.com) and with Custom Sub-Domains (subdomain.yoursite.com).
- A video tutorial can be found at the end of this guide, should you get stuck.
- You must connect your domain to your InfinityFree account first. Read more here.
Set-Up Cloudflare
-
Go to Dash.Cloudflare.com and create a new account, or log in to your existing one.
-
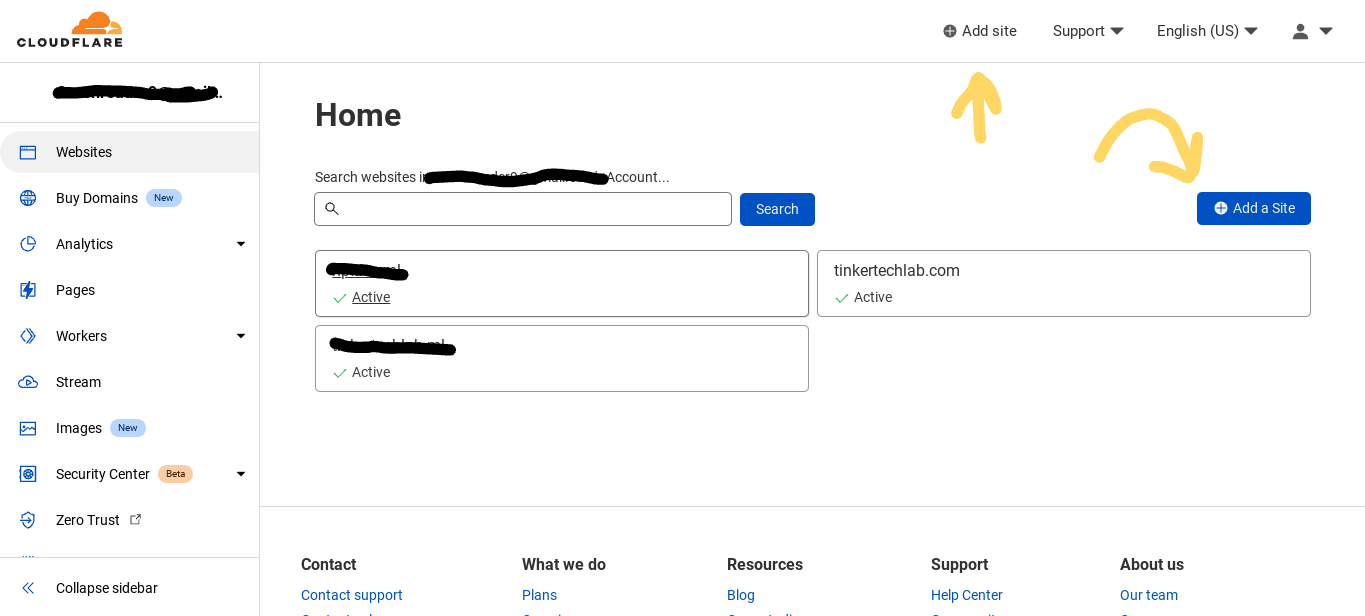
Add a Site (by clicking on the Blue Button or the “Add site” option at the top).
-
Go to the Domain Registrar of your domain (You can look it up by searching your domain here) and change the Nameservers to the ones provided by Cloudflare.
(You may have to scroll down on the page to see this box with the nameservers. Note that you may have different nameservers from those shown here.)

Important Note: The Nameservers provided by Cloudflare should be the ONLY 2 nameservers on your domain. Remove all other nameservers! -
After changing the Nameservers with your domain register, click the “Check” button at the bottom of the page. Note that it may take up to 72 hours for Cloudflare to detect the change.
-
Once the nameservers are verified, go to the DNS section of the dashboard.
-
In the DNS section, click on the blue “ADD RECORD” button, then choose the “A” record type. (NOTE: Steps 6-8 may be done for you by Cloudflare!)

- In a new tab, go to dash.infinityfree.com, log in if needed, then select the hosting account you want to add Cloudflare for. Locate the IP address. (NOTE: Steps 6-8 may be done for you by Cloudflare!)

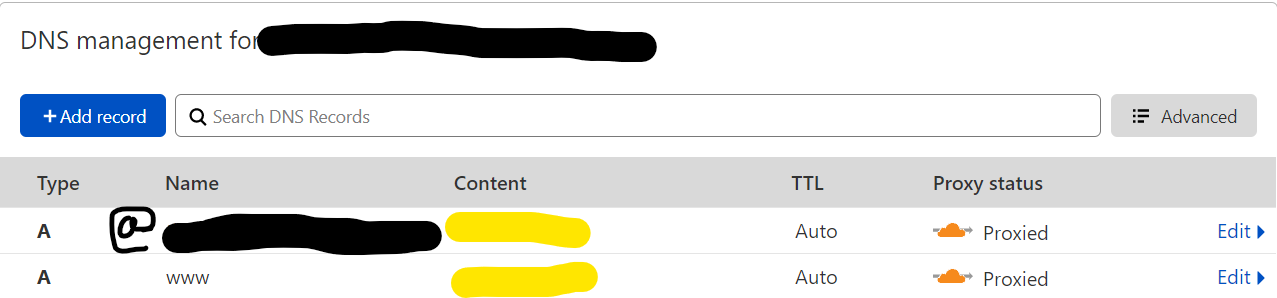
- Copy the IP address from the client area (dash.infinityfree.com) and use it to create the following records: (NOTE: Steps 6-8 may be done for you by Cloudflare!)
RECORD #1
TYPE: “A”
CONTENT: “@”
NAME: IP address from dash.infinityfree.com
RECORD #2
TYPE: “A”
CONTENT: “www”
NAME: IP address from dash.infinityfree.com
Note: Keep the cloud orange for both of the records!
-
Double-check that it looks right! (The yellowed-out text should match all other yellowed-out text.)
-
If something looks wrong, go back a few steps and see what you missed. If it all looks good, your site should start working within 72 hours. If it has been over 72 hours and it still does not work, try clearing your cache. If clearing the cache does not work, create a new topic in the Hosting Support category.
Yay! Cloudflare is now set up on your Domain!
Set up Cloudflare SSL
Setting up Cloudflare SSL is quite easy! These steps are also outlined in the video below should you get stuck.
-
Go to the SSL/TLS section on dash.cloudflare.com.
-
Click on the “Flexible” Setting. If you want to use the “Full” setting (which is more secure), you need to install an SSL certificate first (Self Signed is preferred for use with Cloudflare) - Video - KB article.
-
Open
"SSL/TLS” → “Edge Certificates"in Cloudflare, and enable (Green Slider) theAlways Use HTTPSsetting. -
If you use WordPress, open WordPress Admin and go to Settings → General. Change your URL from
http://tohttps://. A similar process can be followed if you’re using a script/CMS that has a setting for the website’s URL. -
That’s it! (If you go to “https://yoursite.com” it will no longer show the unsecured message!)
OPTIONAL: If someone goes to http://yoursite.com, they will not get the lock icon (They will get the unsecured message). So, you want to have everyone that goes to the unsecured version, automatically get redirected to the secure version! It’s easy to set up too!
Using Cloudflare (The easy way)
In the SSL/TLS → Edge Certificates tab, make sure the setting “Always Use HTTPS” is set to On.
Now, if someone goes to http://yoursite.com, they will be automatically redirected to https://yoursite.com! It’s totally secure now!
With .htaccess
-
Log in to your website via FTP so you can view its files (using the online file manager or with a desktop client like FileZilla).
-
If there is a .htaccess file inside of your website’s /htdocs directory (It should NOT say “DO NOT EDIT” at the top!), add this code at the bottom of the file:
RewriteEngine On
RewriteCond %{HTTP:X-Forwarded-Proto} =http
RewriteRule (.*) https://%{HTTP_HOST}%{REQUEST_URI} [L,R=301]
- If there is NOT a .htaccess file in /htdocs, download the file below and upload it to your website’s /htdocs directory.
.htaccess (126 Bytes)
- That’s it! If you don’t see any changes, clearing your browser’s cache should help!
Now, if someone goes to http://yoursite.com, they will be automatically redirected to https://yoursite.com! It’s totally secure now!
Troubleshoot Cloudflare
What? Cloudflare is not working? Click the arrow next to the text that best matches your issue for an answer. If you cannot get Cloudflare to work, watching the linked video may answer your questions.
My subdomain doesn't work with Cloudflare!
Remember, if you got the sub-domain from InfinityFree, it won’t work with Cloudflare.
If you have a custom subdomain (subdomain.yoursite.com):
A simple fix!
Create a new “A” record in the DNS section of Cloudflare
CONTENT: the name of the sub-domain, so “help” if the domain is help.yoursite.com
VALUE: the IP address of your main domain (Use set-up step #7 to find this)
I get an HTTP 500 error
Make sure you typed everything in correctly, and try clearing your cache or waiting for DNS changes to take effect (up to 72 hours).
The following article from the knowledge base may also help:
Http error 500
SSL not working on my WordPress site
Well, WordPress is a little weird about this.
Make sure you have edited your website’s URL in the admin dashboard to the https:// version of your site. If you’re still facing issues, try installing the “Really Simple SSL” plugin on your WordPress site. If it doesn’t fix your issue either, let us know!
Other
Watch the linked video, reply below, or create a new topic!
Note: If the issue is Cloudflare related, please include a screenshot of your DNS settings.
Did I type something wrong or forgot to add something? Let me know!
Video Tutorial

Final Notes
A big thank you to @TigerMANEK426 and @KangJL for the edits!
