CloudFlare and Freenom installation guide thanks to the help of @Oxy, @anon19508339, @ManuTheCoder & @FlutterHoney . ![]()
IMPORTANT NOTICE: Because of technical issues the Freenom application for new registrations is temporarily out-of-order.
Please accept our apologies for the inconvenience. We are working on a solution and hope to resume operations shortly.
[In this guide I did not use WordPress]
1. Freenom.
-
Create a new Freenom account: https://my.freenom.com/clientarea.php
-
Type in the “Find a new FREE domain” textbox the name of your website and select some free domain (I read before that .tk is forbidden on InfinityFree, maybe it is not or maybe it is).
-
Once created, go to Freenom control panel (https://my.freenom.com/clientarea.php) → Manage Domain → Management Tools → Nameservers. Select “Use custom nameservers (enter below)” and enter the following (tutorial: How to point your domain name to InfinityFree nameservers - Docs - InfinityFree Forum):
- Nameserver 1 →
ns1.infinityfree.com - Nameserver 2 →
ns2.infinityfree.com
- Click on “Change nameservers” and done.
2. InfinityFree.
-
Go to InfinityFree → Accounts → Create Account (Login to your account - InfinityFree).
-
Select “Custom Domain” and type the URL you generated with Freenom, it appears here (https://my.freenom.com/clientarea.php).
-
Click on “Search Domain” → enter the information you want and that’s it.
[Remember to activate cPanel: click on “control panel” → I approve it.]
3. CloudFlare.
-
Go to CloudFlare and log in/create a new account: https://dash.cloudflare.com/sign-up.
-
Once the account is created, we will add a new site. The site is the URL you created with Freenom. Sometimes CloudFlare does not detect domains properly, so either remove the “http://www.” or try several times. In my case it is “strap.ga”, it took a while to recognize it.
-
Once added, a screen will appear where you will be prompted for the DNS that you will need to replace. To do this, Freenom control panel (https://my.freenom.com/clientarea.php) → Manage Domain → Management Tools → Nameservers and replace the 2 DNS.
-
You make the necessary configuration, and activate SSL.
When you are done with all the configuration, you need to wait (and have a cup of coffee hehe) until you see a message similar to this one:
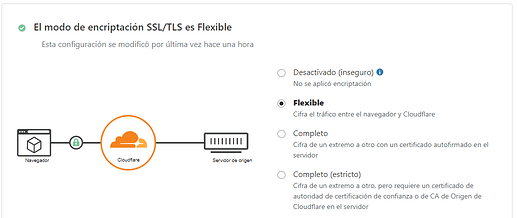
- Finally, check in the SSL section that the option checked is FLEX.
4. Be very patient.
Wait a while for the web to run with SSL, it can take hours. Check from time to time that your website has SSL installed:
5. .htaccess
When I finished configuring everything, I was having redirection problems and was getting the following error “Too many redirects”. This was solved by modifying the .htaccess of your website. Here is what I did:
RewriteEngine On
RewriteCond %{HTTPS} off
RewriteCond %{HTTP:X-Forwarded-Proto} !https
RewriteCond %{HTTP:CF-Visitor} !https
RewriteRule ^(.*)$ https://%{HTTP_HOST}%{REQUEST_URI} [L,R=301]
RewriteEngine On
RewriteCond %{HTTP_HOST} !^www.strap.ga [NC]
RewriteCond %{HTTP_HOST} !^$
RewriteRule ^/?(.*) https://www.example.com/$1 [L,R=301]

