THIS MAY BE OBSOLETE. There are reports that Yandex has discontinued their free business offer. Feel free to try this guide, but it may not work anymore. If you did try this, please reply to the topic to let us know if it was still possible.
If this offer is no longer available, you can get free email through Zoho Mail, or use email forwarding through ImprovMX or Cloudflare.
Recently, Yandex.Mail started throwing the following error when trying to send mail via SMTP when authenticating via the normal plain text login:
Failed to authenticate password. Error: 535 5.7.8 Error: authentication failed: This user does not have access rights to this service.
So I did a little research and found out that using XOAUTH2 authentication is possible. So I am now sharing how to do this with you.
Setting Things Up
Create The Yandex OAuth2 Client
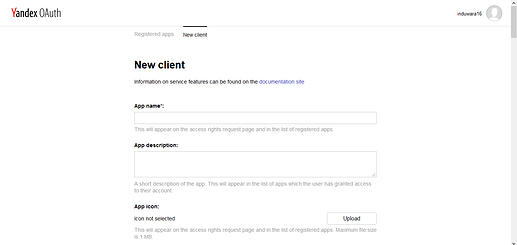
First, we need to create an OAuth2 client using the email you want to connect via SMTP. To do this, make sure you are logged into the required email account, and go to https://oauth.yandex.com/. Then click the “Create New Client” button. You will be directed to a form like the following:
Put any name you like in the app name field, and make sure you have checked the Sending Messages Via Yandex.Mail On The SMTP Protocol permission under Yandex.Mail.
Put your website’s URL into the callback URL field and click the “Create App” button. You will be directed to a page containing some information about the client that looks like the following image:
Do not close this tab because you will need it in the future.
Install The PHP Dependencies
To use OAUTH2 authentication with PHP, you will need a load of dependencies, so you will need to use composer to install them.
Install PHP 7.4 on your local computer from https://php.org. Then install composer using the installer from https://getcomposer.org.
To install the dependencies, run the following commands in a cmd.
cd path\to\your\project
composer require phpmailer/phpmailer
composer require aego/oauth2-yandex
Composer will generate a vendor folder in your project directory, which you can later upload to InfinityFree.
Get The Refresh Token
We need to get a “refresh token” for OAUTH2 to work.
First, go to https://oauth.yandex.com/authorize?response_type=code&client_id=xxxxxxxxx and replace xxxxxxxxx with the ID from the tab containing the information about your client.
You will be redirected to your site’s home page, but with a parameter called code which contains the authorization code, eg: https://example.com?code=12345678. Copy this code.
Now to get the refresh code, go to https://reqbin.com/post-online, put https://oauth.yandex.com/token to the URL, switch to the content tab, select JSON from the dropdown, and put the following inside the content box (change the code, client_id and client_secret’s values):
{
    "grant_type": 'authorization_code'
    "code": 'put the code you just copied here'
    "client_id": 'put the ID from the client information here'
    "client_secret": 'put the password from the client information here'
}
Finally hit send! In the response section’s body, you will see the refresh_token key. Copy the value of refresh_token.
The Email Code
Now finally, you can use the following code to send the email!
<?php
// Import the PHPMailer Library
use PHPMailer\PHPMailer\PHPMailer;
use PHPMailer\PHPMailer\SMTP;
use PHPMailer\PHPMailer\OAuth;

// Import the Yandex provider for the OAuth-Client library
use Aego\OAuth2\Client\Provider\Yandex;

// Load composer's autoloader
require 'vendor/autoload.php';

// Create PHPMailer object
$mail = new PHPMailer();

// Use smtp
$mail->isSMTP();

// Enable smtp debugging
$mail->SMTPDebug = SMTP::DEBUG_SERVER;

// Set smtp host
$mail->Host = 'smtp.yandex.com';

// Set smtp port
$mail->Port = 465;

// Set smtp encryption to smtps
$mail->SMTPSecure = PHPMailer::ENCRYPTION_SMTPS;

// Enable smtp authentication
$mail->SMTPAuth = true;

// Set the authentication method to XOATH2
$mail->AuthType = 'XOAUTH2';

// Set this to your domain's email
$email = '[email protected]';

// Set this to your client id (from the client information)
$clientId = 'xxxxxxxxxxxxxxxxxxxxxxxxxxxxxxxxxxxxx';

// Set this to your client password (from the client information)
$clientSecret = 'xxxxxxxxxxxxxxxxxxxxxxxxxxxxxxxxxxxxx';

// Set this to your refresh token (the one you just copied)
$refreshToken = 'xxxxxxxxxxxxxxxxxxxxxxxxxxxxxxxxxxxxx';

$provider = new Yandex(
    [
        'clientId' => $clientId,
        'clientSecret' => $clientSecret,
    ]
);

$mail->setOAuth(
    new OAuth(
        [
            'provider' => $provider,
            'clientId' => $clientId,
            'clientSecret' => $clientSecret,
            'refreshToken' => $refreshToken,
            'userName' => $email,
        ]
    )
);

// Set the email's display name
$mail->setFrom($email, 'CodeIgniter 4 - JNote');

// Set the email's recipients
$mail->addAddress('[email protected]', 'Induwara16');

// Set the email's charset
$mail->CharSet = PHPMailer::CHARSET_UTF8;

// Set the email subject and body
$mail->Subject = 'Test';
$mail->msgHTML('This Is A Test');

// Send the email!
if ($mail->send()) {
    echo "Success!";
} else {
   echo $mail->ErrorInfo;
}
This code is based on the PHPMailer GMail XOAUTH2 Example, except it uses the Yandex Provider instead of the Google Provider for the oauth2-client library.
Uploading to InfinityFree
I recommend using FileZilla to upload the files to InfinityFree. Just make sure you upload the vendor folder too!
If anything is unclear, please reply to the topic and I’ll help!


