How to set up email on a custom domain for free with Cloudflare and Gmail
There are guides on how to set up a custom email address using Zoho mail and Yandex, but I find Zoho mail very limited (web mail only, no SMTP and anything else) and I am not really comfortable with Yandex, not really sure why) so I have been using a better and still completely free method.
Requisites
In order to follow this guide, you will need:
1.A gmail account
2.A (free) Cloudflare account (If you hate money you can always give Cloudflare some and get some nice features)
3.A custom domain (A subdomain from InfinityFree will not work)
4.Yourself
Instructions
-
Set up your custom domain to use Cloudflare for DNS (see this guide https://forum.infinityfree.com/t/a-full-guide-to-cloudflare/)(If you can’t wait for dns propagation, try switching your dns servers to 8.8.8.8(google dns) or 1.1.1.1(cloudflare dns))
-
Set up email routing with Cloudflare. This will enable us to recive emails with our custom email address. See this article: Enable Email Routing · Cloudflare Email Routing docs Don’t forget to make sure email routing works by sending an email from a address that has not been used as your destination address.
-
Set up a Gmail alias. This is going to be the most confusing and might require some patience, but I belive in you.
A. Log into Gmail and select the settings cog in the right corner.

B. Click See all settings at the top of the pop-out window.
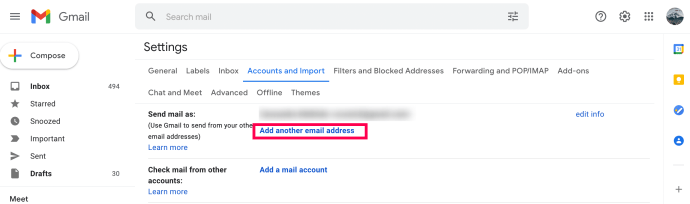
C. At the top, click on Accounts and Import.

D. Next to Send mail as click on Add another email address.
E. Type in your email address, make sure Treat as an alias is checked, and click Next Step.

F. The server details should be server: smtp.mail.google.com username: your gmail address password: your gmail account password if you don’t use 2FA or an app-specific password if you do. I would suggest you use ssl as that’s what works for me.
E. Complete the verification steps to prove that the secondary account is your email account.

To verify your newly added email addresses, you will need to log into your other accounts. Check your inbox for the Gmail verification email and click on the required link.
When you send emails, your alias will show as the Sender rather than the email account you actually use.
You can use this alias for each message. Change your settings by clicking on the From line in your message. If you don’t see a From line, click the space next to the recipient’s email address. Then select the alternate address you want to send from.
- For most people, we are done, except there is now a giant warning on top of the emails that we send saying we might be impersonating someone. To solve this, we will have to add google to our spf record. To do this, sign in back to Cloudflare, go to Websites[sidebar] → (your domain)[main section] → DNS[sidebar] and find the TXT record that currently has the value of
v=spf1 include:_spf.mx.cloudflare.net ~all
replace it to
v=spf1 include:_spf.mx.cloudflare.net include:_spf.google.com ~all
And we are done! If you have any questions, feel free to post them down below!